If you’re looking to add some color and variety to your garden, planting annuals is a great way to go. Annuals are plants that complete their life cycle in one year, from seed to flower. They come in a wide range of colors and sizes, and can be used to fill in gaps in flower beds, borders, and containers.
To encourage the most flower production, it’s important to choose annuals that thrive in your local climate and soil conditions. There’s a wide variety of annuals to choose from, so you’re sure to find ones that suit your taste and garden style. Annuals can be purchased as potted seedlings or as seeds, depending on your preference.
When planting annuals, it’s important to prepare the soil beforehand. Remove any weeds or grass from the area where you’ll be planting, and add compost or organic matter to improve soil fertility and drainage. Gently loosen the root ball of the plant and place it in the hole, making sure the top of the root ball is level with the soil. Fill in around the plant with soil, firming it gently with your hands.
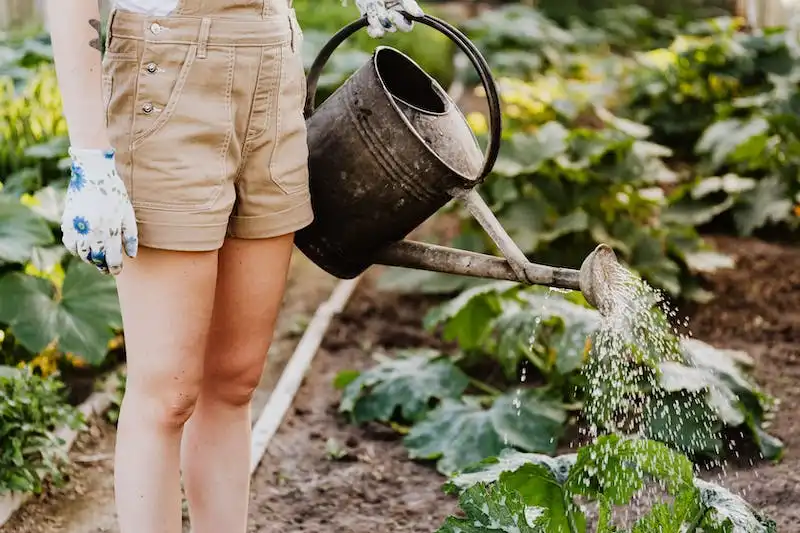
After planting, water the annuals well. This helps to settle the soil and ensures that the roots make good contact with the soil. Mulch around the plants to help conserve moisture and suppress weeds. Mulch can also add a decorative element to your garden, and helps to keep the stems and flowerheads clean.
Annuals are fast-growing plants, and they’ll quickly establish themselves in your garden. Once they’re in the ground, it’s important to water them regularly, checking the soil moisture level every few days. If the soil is dry an inch below the surface, it’s time to water again. During hot, dry periods, you may need to water your annuals more frequently.
With a little bit of planning and care, annuals will reward you with a beautiful display of flowers all season long. Whether you’re looking for a single, standout plant or a combination of colors and textures, annuals can be used to create stunning garden designs. So get started planting your annuals today and enjoy the vibrant colors they’ll bring to your garden!
How to Plant Annuals
Planting annuals is a great way to add vibrant colors and unique flowerhead to your garden. Whether you’re a beginner or an experienced gardener, knowing how to plant annuals properly will ensure their successful growth and development.
Before you start planting your annuals, you’ll need to gather the right materials and understand their basic needs. Here are some tips to help you plan and prepare:
| What You’ll Need | Planting Tips |
| – Annual plants | – Choose a spot with enough sunlight or shade based on the specific plant’s needs |
| – Garden beds or containers | – Prepare the soil by loosening it with a garden fork or tiller |
| – Mulch | – Dig a hole that is slightly bigger than the root ball of the plant |
| – Watering equipment | – Gently remove the plant from its pot, being careful not to damage the roots |
| – Fertilizer | – Place the plant in the hole and fill it in with soil, gently firming it around the stem |
| – Gardening gloves | – Give the plant a light squeeze to ensure good soil contact and remove any air pockets |
| – Bonus: a gardening team to help with the planting process! | – Water the newly planted annual thoroughly to help settle the soil |
Once you have all the necessary materials and have followed the instructions above, you can start planting your annuals. Here’s a step-by-step guide:
- Select a spot in your garden beds or containers where you want to plant the annuals.
- If you’re planting multiple annuals, space them at least 6-12 inches apart to allow for their growth and proper establishment.
- Using a garden fork or tiller, break up the soil in the planting area and remove any weeds or debris.
- Prepare the soil by mixing in compost or fertilizer to provide the necessary nutrients for the plants.
- If planting in a container, ensure it has proper drainage to prevent waterlogging.
- Make a hole in the soil that is slightly deeper and wider than the root ball of the plant.
- Gently remove the plant from its pot, holding it by the root ball, and place it in the hole.
- Fill the hole with soil, firming it gently around the stem to secure the plant in place.
- Water the newly planted annual thoroughly, making sure the water reaches the root zone.
- Add a layer of mulch around the plants to conserve moisture and suppress weeds.
After planting, make sure to provide regular watering and maintenance to ensure the healthy growth of your annuals. Follow any specific care instructions that come with the plants, and enjoy the beautiful blooms throughout the year!
Planning Your Garden
When it comes to planting your annuals, it’s important to plan your garden carefully. You need to have a good grasp of which plants will thrive in your specific climate and soil conditions. Think about whether you want to create a colorful focal point or a filler for in between other plants. Consider the color and seasonal blooming of each plant, and whether they will be placed in full sun or partial shade.
Once you have a team of plants in mind, it’s time to prepare the soil. Dig deep and add compost or peat moss to make it richer and fuller. If you’re planting seeds, ask the gardening editor for tips on the best combination of plants to use. Always dig holes for your plants that are slightly larger and deeper than their root systems. Thoroughly water the holes before planting, as moist soil helps with establishment.
Before you plant, make sure you choose the right tools for the job. A trowel or small shovel works well for digging holes, while a rake can be used to level the surface and remove any debris. Once you’ve planted, firm down the soil around the roots to ensure there’s good contact.
After planting, mulch the surface to help retain moisture and suppress weeds. This will also give your garden a finished look. While your plants are growing, water them deeply and regularly. If you’re unsure how often to water, a good rule of thumb is to check the soil and water when the top inch is dry. Feed your plants with a balanced fertilizer according to the package instructions.
As your plants begin to grow, you may need to provide support in the form of stakes or cages. Some plants, like zinnias, can become top-heavy with large flowerheads and will require extra support. Whether you’re planting in containers or outdoors, make sure to give each plant enough space to thrive. Prune any dead or wilted blossoms to encourage new growth.
With proper planning and care, your garden will be filled with vibrant blooms and lush foliage. Take the time to plan ahead, and soon you’ll be enjoying the beauty of your own garden oasis!
Seeds or Plants
When it comes to planting annuals, you have the choice between starting from seeds or purchasing established plants. Both options have their advantages and considerations, so it ultimately depends on your preferences and circumstances.
If you’re an overwhelmed beginner gardener or have limited time, starting with established plants might be the way to go. It’s a quicker and more straightforward process, as you simply need to dig a hole and place the plant in the desired location. This is especially helpful when you’re aiming for a specific color scheme or want to plant a variety like petunias or zinnias that may not easily grow from seed.
However, if you’re an experienced or adventurous gardener who enjoys the challenge and unique options, starting from seeds can be a rewarding experience. It gives you control over the entire process, from the early development of seedlings to the establishment of sturdy plants. Plus, it’s an affordable way to grow a large number of annuals. Just make sure to follow the instructions on the seed packets carefully, as different plants have specific requirements.
Here are some tips to keep in mind when starting from seeds:
| Tip | Explanation |
| Seedlings need light | Ensure your seedlings receive enough light by placing them near a sunny window or using artificial grow lights. |
| Seedlings need water | Make sure to keep the soil consistently moist but not waterlogged. Water from the bottom of the container to avoid wetting the foliage, which can promote disease. |
| Seedlings need strong stems | To encourage strong stem growth, gently shake your seedlings once a week. This mimics the wind and helps them develop thicker and sturdier stems. |
| Root development | Avoid root-bound seedlings by transplanting them into slightly larger containers as soon as they outgrow their current ones. This ensures healthy root development. |
| Well-draining soil | Use a well-draining soil mix or add perlite or vermiculite to improve drainage. Excess moisture can lead to root rot and other issues. |
| Firm soil | After transplanting your seedlings, gently firm the soil around them. This provides support and stability to the young plants. |
| Feed seedlings | Once the seedlings have developed their first set of true leaves, begin feeding them with a diluted fertilizer every other week. This will ensure they have the necessary nutrients for healthy growth. |
Whether you choose seeds or plants, always plan ahead. Consider the lighting conditions, soil quality, and space in your garden beds. Make a list of the annuals you want to grow and determine the best placement for each based on their height and foliage. If you’re working with a small space, you can also squeeze in some annuals in containers.
Remember, annuals offer a burst of vibrant colors and lush foliage to your garden. They’ll grow quickly and provide continuous blooms throughout the growing season. So, whether you’re a novice gardener or a seasoned expert, with some planning and care, your annuals will thrive and enhance the beauty of your outdoor space.
Starting From Seed
Starting plants from seed is a great way to add a variety of colors and blooms to your garden. Whether you have a small bed or a large garden, planting annuals from seed can be a fun and rewarding experience.
To start planting from seed, first prepare the soil by loosening the surface with a garden fork. Remove any weeds or debris that may be present. Squeeze your soil to see if it forms a clump or crumbles. If it forms a clump, it may be too moist and needs to dry out a bit more.
If it crumbles, it is ready for planting. Before sowing the seeds, soak them in water for a few hours to ensure proper hydration. Follow the instructions on the seed packet for how deep to plant the seeds and how far apart they should be spaced.
Once planted, gently firm the soil around the seeds with your hands or a small garden tool. Water the area thoroughly, making sure to keep the soil evenly moist. An easy way to do this is to cover the area with a layer of moss or compost.
While you wait for your seeds to germinate, it is important to provide the right conditions for their development. Most annuals need full sun or partial shade to thrive. If you are unsure what kind of conditions a particular plant needs, consult your local garden center or do a quick online search.
Once your seedlings have sprouted, continue to water them regularly and feed them with a balanced fertilizer. As the plants grow, they may need to be transplanted into larger pots or into the garden. Follow the instructions on the seed packet or ask your local garden center for guidance on when and how to transplant.
Establishing your seedlings in the garden can be an overwhelming task, but with some basic preparation, it can be made easier. Dig a hole that is large enough to accommodate the roots of the plant. Gently remove the plant from its pot and place it in the hole. Backfill with soil, making sure the plant is at the same level it was in the pot.
Once planted, firm the soil around the plant and water thoroughly. Mulch the area around the plant with a combination of organic materials to help conserve moisture and suppress weeds.
Throughout the growing season, continue to water and feed your plants as needed. Pinch back any leggy growth to encourage bushier plants. Deadhead spent blossoms to promote more blooming. Enjoy the beauty of your annuals all season long.
Starting plants from seed is a cost-effective way to fill your garden with a variety of colors. It may take some time and effort, but the rewards are well worth it.


