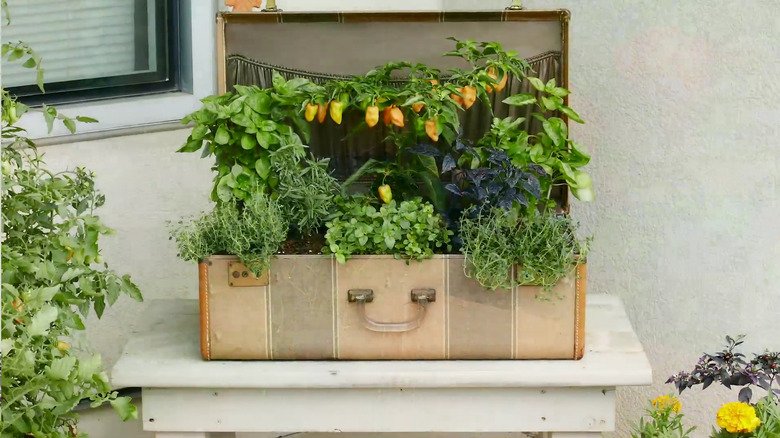
Okay, you want to create some trendy décor for your garden, but where do you start? If you’re stuck for ideas, you could use a TikTok hack by @mylynnandridge for inspiration, which shows how you can thrift a vintage suitcase from a local store and turn it into a stylish and unique DIY planter. While the thought of plants and a suitcase going together may seem bizarre, in this case, they actually go hand in hand to create an impressive, vintage floral display that will capture the eyes of anyone who spends time in your garden. Due to its size, it’s perfect if you want to implement several plants into one space rather than just one, and will even make for a trendy indoor planter in your home.
Another great benefit is that it should be relatively cheap if you’re getting one from a thrift store, especially if you already have the flowers you want to implement. If you’ve been wanting to upgrade your backyard on a budget, this is the ideal opportunity. Of course, you can also choose how big or small your suitcase is, so you have the ability to get something that fits your space. But how do you make it?
Find a vintage-looking suitcase
“Unleash Your Floral Wanderlust! 🌺✨ Thrifted Suitcases Turned Flower Planters 🌿🧳 Adding Vintage Charm to Your Garden Bed! 🌸🏞️ #FlowerPower #GardenInspiration #ThriftedTreasures #BloomingInStyle #diyproject #outdoorprojects
♬ Halloween ・ cute horror song – PeriTune
Watch on TikTok
To complete this DIY hack, you’ll need an old suitcase from a thrift shop, some potting soil, a shovel, an electric screwdriver, a clear plastic sheet, and your chosen plants. If you don’t know anywhere local to find a suitcase, look online on sites such as eBay or Etsy and find options such as this old vintage one for $59.18. Now you have everything on hand, it’s time to get to work. Start by prepping, which you can do by measuring, cutting, and placing down a layer of clear plastic sheet at the bottom of your suitcase where the soil will go. This will help to protect it. You’ll also need to add some holes for drainage, which you can insert using your electric screwdriver on the underside of the product. To make this process easier for yourself, plan where you want to put your planter beforehand so you don’t have to move it when it’s heavy, as you may find it challenging.
Once you place it down where you want, add your potting soil and begin adding your plants of choice, whether flowers, herbs, succulents, or any hardy options that tickle your fancy — the choice is all yours. It all depends on whether you want a “pop” of color or not. You could even experiment with some companion planting, but on a smaller scale, of course. Once done, simply slide your DIY custom planter in place and enjoy the breathtaking view!
Styling your DIY suitcase planter

Burpee/YouTube
One easy way to switch up the look is by opting for a different theme or style or customizing it with some extra décor. You could do so by adding custom pins, pushing small solar lights into the potting soil, applying another layer of custom material over your plastic sheet (provided there are drainage holes), or even adding your own material over the outside and remodeling the entire look. Some funky mushroom solar lights are available from Walmart for $13.99, or some solar-powered string lights for $12.99. By implementing this subtle touch, you’ll be able to see your gorgeous DIY suitcase planter during nighttime, making it look more magical than ever.
One caveat to keep in mind with this DIY is the weathering of the material on the suitcase, which could become damaged and moldy if it rains a lot. To avoid this potential effect, consider keeping your planter indoors or only keeping it out during summer and spring when the weather tends to be warmer. What’s right for you will all depend on the climate in your area. If you want it out all year round, it may be worth considering covering the whole thing with a clear, waterproof sheet to protect the material. Wrap it around tightly to ensure there are no gaps aside from the drainage holes. Alternatively, you could always put it in a drier spot, such as a porch area or under a canopy.


