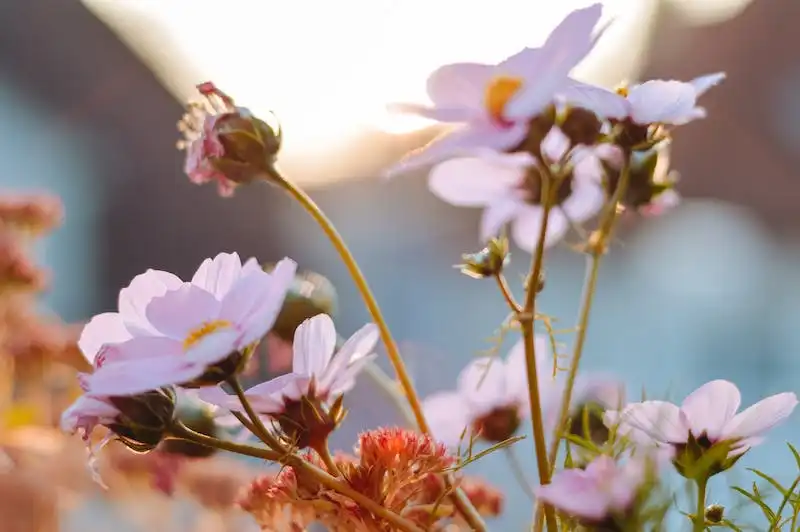
If you want to start growing anemones, we have a planting guide for you. Anemones are beautiful flowers with delicate petals that bloom in a variety of colors. They can be planted in the fall or early winter and will start blooming in the spring. These plants are easy to care for, making them a great addition to any garden.
Before you start planting your anemones, you need to prepare the soil. Anemones prefer well-drained soil, so make sure you choose an area with good drainage. If your soil is heavy and clay-like, you may want to add compost or sand to improve the drainage. It’s also a good idea to test the pH of your soil to make sure it’s in the ideal range for anemones.
Once you have prepared the soil, you can start planting the anemone bulbs. Anemone bulbs should be planted at a depth of about 2-3 inches. For best results, space the bulbs about 4-6 inches apart. If you’re growing anemones in a colder climate, you may want to plant the bulbs a little deeper to protect them from frost.
After planting the bulbs, be sure to water them well. Anemones need regular watering, especially during the growing season. However, be careful not to overwater them, as they don’t like to sit in waterlogged soil. You can expect your anemones to start blooming around 6-8 weeks after planting the bulbs.
When the anemone blooms, you can harvest the flowers for a beautiful bouquet. To do this, simply cut the stems about 1 inch above the surface of the soil. Anemones are great for cut flowers, as they have a long vase life and the blooms will continue to open and last for several days.
As the weather gets colder, the anemone plants will start to die back. This is normal, and the bulbs will rest during the winter months. In colder zones, you may want to cover the bed with a layer of mulch to protect the bulbs from frost.
In the spring, as the weather warms up, the anemone bulbs will start to grow again. You can expect to see blooms earlier in the season if you’re growing Caen anemones or other early blooming varieties. Gently remove the mulch and plan to enjoy another season of beautiful anemone flowers!
In conclusion, growing anemones is a rewarding and easy process. With a little bit of planning and care, you can have a colorful display of blooms in your garden. Follow this planting guide, and you’ll be well on your way to growing beautiful anemones!
Source: Anemone Planting Guide – Where to Plant, How to Plant, and How to Care for Anemones
Anemones
Anemones are a type of bulbous plant that produce beautiful, small-sized blooms. They are well-suited to colder climates and thrive in well-drained soils. Anemones are often found in woodlands, making them a great addition to shady areas in your garden.
When planting anemones, it’s important to position them in a spot where they will receive full or partial sun, depending on the variety. They should be planted at a depth of about 2-3 inches, with the pointed end facing up. Expect the roots to grow downwards while the foliage emerges above ground.
Most anemones will bloom in the late winter or early spring, with some varieties producing flowers as early as late fall. To ensure success with your anemone bulbs, it’s important to start the planting process in the right season. Anemones are best planted in the fall, about 6-8 weeks before the first frost date in your area.
Before planting, it’s a good idea to soak the bulbs in water for a few hours to help them develop properly. After soaking, position the bulbs in the soil with their roots facing downwards and cover them gently. Anemones can be planted individually, or you can plant them in groups of 6-8 bulbs for a fuller display.
Anemones are easy to care for, but they do require some extra attention during the growing seasons. They prefer well-drained soils and will suffer if planted in heavy or clay soils. It’s also important to water them thoroughly after planting and during dry periods. Anemones are fairly resilient, but they can be susceptible to frost damage. If you live in a colder climate, it’s a good idea to cover the plants with a layer of mulch to protect them during the winter months.
Anemones come in a variety of colors and types, including Anemone canadensis, A. caen, and A. hybrida. Each type has its own unique characteristics and bloom times, so be sure to choose the varieties that best suit your garden.
With proper planting and care, anemones will reward you with their beautiful blooms year after year. Whether you’re a seasoned gardener or just starting out, this planting guide will help you grow anemones successfully and enjoy their vibrant flowers throughout the seasons. So why not give it a try and add some anemones to your garden this year?
Propagation and where to snag ‘em
If you are always looking for a guide on how to grow anemones, they are best planted in the late summer or early fall for colder zones. Anemones are typically grown from bulbs, or corms, which should be planted in well-drained soil. They are easy to grow and require little care.
When planting anemones, make sure to choose a location that receives full sunlight. Anemones prefer a soil pH of 6.0 to 7.0 and thrive in rich, loamy soil. Before planting, thoroughly soak the bulbs in water for about 2 hours to help hydrate them before planting.
Once you have chosen a suitable planting location, dig a hole about 2 to 4 inches deep and place the anemone bulbs in the hole, 2 to 3 inches apart. Cover the bulbs with soil and water thoroughly. As the bulbs produce foliage, make sure to keep the area well-watered.
In the winter, anemone bulbs are best suited to areas with mild climates, as they are not frost-tolerant. If you live in a colder zone, you may need to mulch over the bulbs to protect them from freezing temperatures.
When spring comes, you can expect beautiful blossoms from your anemone plants. The flowers are usually single-petaled, but there are also double-flowered varieties available. Cut the flowers when they are in bud and place them in a vase to enjoy their beauty indoors.
Anemones are often planted as spring-blooming annuals, but they can also be grown as perennials in suitable climates. After the flowers have finished blooming, allow the foliage to die back naturally. This allows the bulbs to store energy for the next growing season.
To harvest anemone bulbs, wait until the foliage has completely died back. Then, carefully dig up the bulbs and store them in a cool, dry place until it’s time to plant them again.
In conclusion, anemones are beautiful and easy to grow plants that can add a touch of color to any garden. With proper care and attention, you can enjoy these lovely flowers year after year.
Anemone Planting Guide
When it comes to planting anemones, it’s important to follow a guide to ensure that you get the best results. Anemones are beautiful flowering plants that can add a touch of elegance to any garden or landscape. Whether you’re a seasoned gardener or just starting out, this guide will help you understand how and when to plant anemones.
Choosing the Right Time and Location
Anemones are typically planted in the late winter or early spring, before the frost thaws and the ground begins to warm up. They thrive in well-draining soil and prefer areas that receive full sunlight or partial shade. Take care to choose a planting location that meets these requirements.
Preparing the Soil
To ensure that your anemones grow well, it’s important to prepare the soil properly. Start by clearing the area of any weeds or debris. Then, use a gardening fork or shovel to loosen the soil to a depth of about 12 inches. This will allow the roots of your anemones to develop properly.
Planting the Anemones
When it’s time to plant your anemones, dig holes that are about 2 inches apart and 2 inches deep. Gently place each bulb in the hole, making sure that the roots are positioned downward and the growing tip is facing up. Cover the bulbs with soil and press down gently to secure them in place.
Caring for Your Anemones
After planting your anemones, be sure to water them thoroughly. This will help to settle the soil and provide the bulbs with the moisture they need to grow. Additionally, you can apply a layer of mulch around the plants to help retain moisture and prevent weed growth.
Planning for Bloom Time
Depending on the variety of anemone you plant, it will take anywhere from a few weeks to a few months for the plants to begin flowering. Some varieties, such as the De Caen anemones, flower earlier in the season, while others may take longer to develop blooms. Take note of the expected bloom time for the specific type of anemone you have planted.
Taking Extra Care
If you live in an area with harsh winter conditions, you may need to take extra care to protect your anemones. Consider covering them with a layer of cloth or mulch to insulate the plants and safeguard the bulbs from frost and freezing temperatures.
Selling the Anemones
If you have a surplus of anemones that have flowered, consider selling them. Anemones are popular plants, and many people would be interested in purchasing them to add to their own gardens. This is a great way to share your love of gardening and make a little extra money in the process.
By following this guide, you can ensure that your anemones will thrive and produce beautiful flowers. Enjoy the process of planting, caring, and watching your anemones grow!
Anemone Bulbs
When it comes to planning your garden, whether it’s in woodlands or your backyard, anemone bulbs are one of the best choices for a beautiful spring-blooming display. They always bring a burst of color and can brighten up any garden or flower bed.
When planting anemone bulbs, it’s always better to start in the late winter/early spring. Soaking the bulbs in water for a few hours before planting can help jumpstart their growth. Anemone coronaria, the most popular bulb variety, is typically planted at a depth of 2-3 inches, while Anemone canadensis should be planted a little deeper, around 4-6 inches.
Position the bulbs with the pointed end facing up and space them about 4-6 inches apart. Make sure to plant them in well-drained soils to prevent waterlogging. It’s always a good idea to add a layer of compost or well-rotted manure to improve the soil’s fertility.
Anemone bulbs typically bloom in early to late spring, depending on the variety. If you’re looking for a continuous bloom, you can stagger the planting times by a few weeks to ensure a longer flowering period. The blossoms usually last for a few weeks, and their vibrant colors can vary from white and pink to purple and red.
Caring for anemone bulbs is relatively easy. They require regular watering, especially during dry spells, but avoid overwatering, as that can lead to rot. Remove any faded or damaged flowers to keep the plant looking fresh. After the foliage dies back, you can harvest the bulbs for replanting or leave them in the ground for natural propagation.
While anemone bulbs are hardy and can survive USDA zones 4-9, it’s always a good idea to mulch them in the winter to protect them from freezing temperatures. When the growing season starts again, make sure to remove the mulch to allow them to emerge.
These bulbs are a favorite of farmers and home gardeners alike. They’re easy to grow, and their beautiful flowers make them a selling point at farmers’ markets and garden centers. Anemone bulbs are well-suited for both beginner and experienced gardeners, so don’t be afraid to give them a try!


