Repotting is an important task for growers of cymbidium orchids. These decorative plants can become root-bound and require a new potting medium to thrive. Repotting allows the orchid’s roots to spread out and promotes optimal growth.
Before repotting, it’s important to prepare the new pot and potting medium. Cymbidium orchids grow well in plastic pots, and it’s recommended to use a pot that is at least one size larger than the current one to allow for root expansion. A pencil or similar tool can be used to carefully remove the orchid from its current pot. It’s crucial to be careful not to damage or break any roots during this process.
Once the orchid is out of its pot, the old potting medium should be removed from the rootball. This can be done by gently shaking or washing off the medium. If the roots appear to be tightly bound, it might be necessary to carefully loosen them. Some growers prefer to use a sterilized cutting tool to make a few small cuts into the rootball to encourage new root growth.
Before placing the orchid into its new pot, it’s recommended to clean and sterilize the pot to prevent the spread of bacterial or fungal infections. A mixture of water and bleach can be used to clean the pot thoroughly. To create a suitable potting medium, a mix of coir fiber and perlite or leca pellets can be used. This combination provides good drainage and aeration for the roots.
When repotting, the orchid’s base should be placed slightly above the pot’s rim, as cymbidiums prefer to have their roots exposed to air and light. Gently press down on the new potting medium to provide stability for the orchid. After repotting, the orchid should be placed in a shady or partially shaded location for a couple of weeks to allow it to acclimate.
Cymbidium orchids should be repotted every two to five years, depending on their growth rate and potting medium condition. However, if the orchid is healthy and shows signs of new growth, such as new leaves or pseudobulbs, then it might not require repotting. Divisions can also be made during repotting if the orchid has multiple growths or pseudobulbs. Care should be taken during division to ensure that each new division has a healthy root system.
Overall, repotting cymbidium orchids is a crucial task for their well-being and growth. By following these steps and being careful with the orchid’s roots, growers can ensure that their orchids continue to thrive and produce beautiful blooms for many years to come.
How to Repot Orchids Cymbidium
When it comes to repotting Cymbidium orchids, timing is everything. It’s best to do it in the morning when the plant is leafless and dormant. This is usually during the winter months.
Before you begin, make sure to gather all the necessary supplies. You’ll need a clean pot, such as a plastic one with drainage holes, potting mix (such as LECA or others suitable for orchids), and some sterilized tools.
To repot, gently pull the orchid out of its current pot. If there are any back-bulbs or keikis (baby plants) attached, you can separate them and plant them elsewhere in your garden.
Once the plant is out, carefully remove as much of the old potting mix as possible without damaging the roots. You can use a brush or your fingers to do this.
Next, examine the roots. If they’re healthy and not overcrowded, you can repot the orchid back into its original pot. If needed, use a clean and sterilized pair of scissors to trim any dead or damaged roots.
Now it’s time to prepare the new pot. Fill it with fresh potting mix, leaving a space at the top to allow for watering. Some orchid growers like to add a thick layer of LECA or orchid bark to improve drainage.
Place the orchid back into the pot, making sure the roots are spread out evenly. Gently press the potting mix down to secure the plant.
After repotting, you may notice that the orchid looks bare or lacks roots. Don’t worry, this is a normal part of the repotting process and the plant will recover.
Water the orchid thoroughly after repotting to help settle the potting mix and hydrate the roots. Use room temperature water and pour it slowly over the top of the potting mix, allowing it to drain out the bottom.
Place the repotted orchid in a shaded area, away from direct sunlight. It’s best to keep it in a greenhouse or indoors until it has fully recovered from the repotting process.
Remember to clean and sterilize your tools after repotting, as this helps prevent the spread of diseases and pests.
Repotting Cymbidium orchids is a slow and delicate process that requires patience and care. Following these steps will ensure that your orchids thrive and continue to show off their beautiful flowers.
Source: Adapted from a conversation with an experienced gardener
Repotting My Cymbidium Orchids
Repotting cymbidium orchids is an essential care task that I perform every few years. As a dedicated orchid enthusiast, I have learned that repotting helps ensure the health and vitality of these beautiful plants. In this article, I will guide you through the steps involved in repotting cymbidium orchids.
Choosing the Right Time
Repotting cymbidium orchids can be done in late winter or early spring, usually between January and March. It is best to carry out this task during their dormant period. Although cymbidiums can be repotted at any time, repotting them during this time will minimize disturbance and ensure a better recovery.
Gathering the Materials
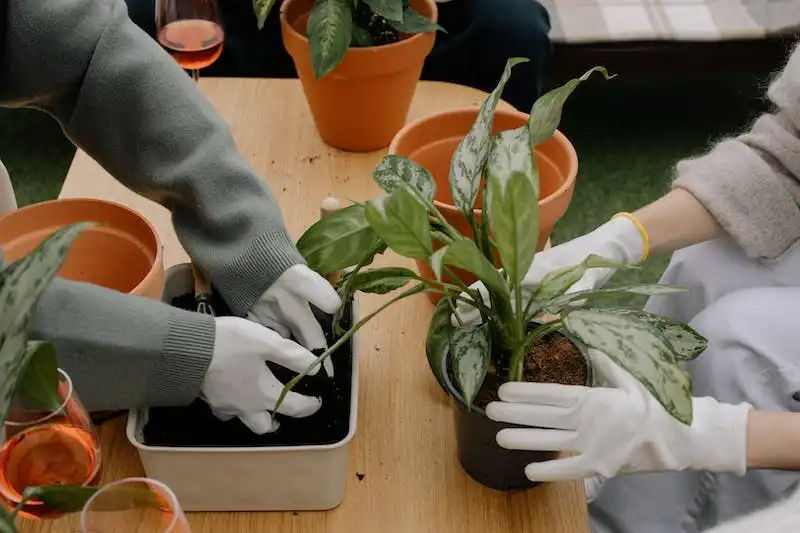
To repot my orchids, I gather all the necessary materials beforehand. I like to have a potting mix specifically designed for orchids, made up of a combination of bark chips and sphagnum moss. Additionally, I ensure I have gloves to protect my hands and a sterilizing solution like bleach to clean my tools.
I also make sure I have a clean and sturdy surface to work on, such as a table lined with plywood or a potting bench. This helps to avoid any mess and provides a reliable workspace.
Preparing for Repotting
Before repotting my cymbidium orchids, I start by watering them thoroughly. This ensures that the roots are well-hydrated and makes them easier to work with. I follow this by soaking the pot in water for a few minutes to loosen the rootball from the potting mix.
Once the potting mix is moistened, I carefully remove the orchid from its current pot. To do this, I gently grasp the base of the plant, taking care not to crush any of the delicate roots. If the orchid is bound tightly in the pot, I may need to gently tease the roots apart using my fingers or a sterilized pencil.
Replacing the Potting Mix
After removing the orchid from its pot, I take the opportunity to inspect the roots. If any are damaged or rotted, I trim them away with sterilized scissors or pruning shears. It is important to remove any dead or unhealthy roots to promote new growth.
Next, I select a slightly larger pot that allows for the orchid to have some room to grow. I fill the pot one-third full with the potting mix and then gently place the orchid into the pot, ensuring that the roots are spread out and well-supported.
I then add more potting mix, gently pressing it down around the roots to secure the orchid in place. It is important to note that cymbidium orchids prefer to be slightly crowded, so avoid using a pot that is too large.
After Repotting Care
Once the orchid is repotted, I water it thoroughly to ensure that the potting mix is evenly moistened. After watering, I place the orchid in a well-lit area with indirect sunlight. Cymbidium orchids prefer bright but filtered light, so I usually place them near a window or under a shade cloth in my greenhouse.
In the weeks following repotting, I monitor the orchid closely to ensure that it is adjusting well to its new pot and potting mix. If needed, I provide additional support by using stakes or bamboo canes to help hold up the tall flower spikes.
I also make sure to keep the orchid well-watered during this time. Cymbidiums prefer to dry out slightly between waterings, so I water them when the potting mix is slightly dry to the touch.
Conclusion
Repotting cymbidium orchids is a necessary task for maintaining their health and promoting new growth. By carefully following the steps outlined in this guide, you can ensure that your orchids will thrive and continue to produce beautiful blooms.
| Key Points |
|---|
| Repot cymbidium orchids during their dormant period, preferably between January and March. |
| Prepare all the necessary materials before repotting, including gloves, sterilizing solution, and a potting mix designed for orchids. |
| Water the orchids thoroughly before removing them from their pots to make the roots easier to work with. |
| Inspect the roots and trim away any damaged or rotted ones before repotting. |
| Place the orchid in a slightly larger pot, ensuring the roots are spread out and supported by the potting mix. |
| Water the orchid after repotting and place it in a well-lit area with indirect sunlight. |
| Monitor the orchid closely and provide additional support if needed. |
| Keep the orchid well-watered, allowing the potting mix to dry slightly between waterings. |
Repotting Cymbidium Orchids
When it comes to repotting cymbidium orchids, it is important to understand the rootball and the extent to which it has grown. Cymbidium orchids are typically grown in hydroponics or in a potting mix that contains a mix of redwood fiber, perlite, and finer bark.
To repot a cymbidium orchid, start by gently working the rootball out of the current pot. You may need to use a pencil or your fingers to carefully loosen the roots from the potting mix. Be careful not to break any roots in the process.
Once the rootball is out of the pot, inspect the roots for any signs of disease or viruses, such as TMV-O or CymMV. If you notice any viruses, it is important to separate the infected plants from the healthy ones to prevent the spread of the disease.
If the rootball is heavily root-bound, meaning the roots have tightly packed together, it may be necessary to divide the plant. To do this, use a clean, sharp knife to separate the rootball into smaller sections. Each section should have its own growth points and roots.
When repotting a cymbidium orchid, make sure to use a clean pot with good drainage. Place a layer of LECA (lightweight expanded clay aggregate) at the base of the pot to improve drainage. Then, position the orchid in the pot, making sure the base of the plant is slightly above the rim of the pot.
Add fresh potting mix around the rootball, gently pressing it down to secure the plant. Avoid burying the pseudobulbs or back-bulbs of the orchid, as they need light to produce energy for flowering.
After repotting, place the newly potted cymbidium orchid in a shaded area. This will help the plant adjust to its new environment and reduce the risk of sunburn. Over the next few weeks, gradually increase the amount of sunlight the plant receives until it is able to tolerate full morning or afternoon sun.
During the winter months, keep cymbidium orchids in a cool, but not freezing, area of the greenhouse. This will encourage bud development and help initiate the flowering process in the spring.
Remember to water the newly repotted cymbidium orchid regularly, but be cautious not to overwater. Allow the potting mix to dry out slightly between waterings to prevent root rot. Regularly check the humidity levels and adjust if necessary to ensure optimal growing conditions for your cymbidium orchids.
By following this guide, you can ensure a successful repotting process for your cymbidium orchids and help them thrive in their new environment.


